Arduino Tutorial
The SentiloClient Library for Arduino offers a basic C++ library implementation that allows to the developer a quick integration sketch with the Sentilo Platform through its API Rest Client.
For these examples we’ll create a new sensor in the Sentilo Platform, only if it doesn’t exists, and then we’re going to publish some observations obtained from the local sensors.
Hardware
We’ll need some hardware materials:
| Material | Description |
| >Arduino board | We recommend that you use a Mega 2560 board, which brings to you a bit more program memory than Uno. |
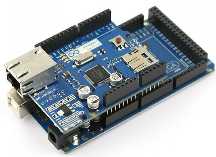
| >Official Ethernet Shield for Arduino | The library is based on the communication layer that provides the Official Ethernet Shield. Basically, it is a http rest client module. |
| Some sensors | For these examples we’ll use two types of sensors: a LM35 temperature sensor, and a basic LDR brightness sensor (photocell) |
| Resistors | Two 1KOhm resistors 1/4W |
| Breadboard | A breadboard that allow to you the quick connection of the electronic components |
| Wires | Connection wires, like ‘dupont’ male-to-male ones, that brings to you easily connection between the Arduino board and the breadboard and the sensors |
| Ethernet cable | A cable for connecting the Ethernet Shield to the Internet through your router o modem |
| B type USB cable | A cable for connecting your Arduino board to the PC |
Software
We’ll use the Official Arduino IDE, that you can download from here. Of course, you’ll need a PC, with Windows or Linux, or a Mac computer.
Setup the Arduino
The Arduino IDE
We assume that you have installed the Arduino IDE and you know how to use it :). If not, then you can have a look on this link.
Download and install the library
Download our SentiloClient library or clone it from Git via this link: https://github.com/sentilo/sentilo-client-arduino, and then install it as a custom library into your Arduino IDE. If you don’t know how to install custom libraries, you can have a look on this link, see the Importing a .zip Library section.
The example
First example: publishing a basic observation
Once you have installed the library into the Arduino IDE, you can go to the menu option File > Examples > SentiloClient > SentiloClient-Example-01 and open the sample code. In this example Arduino is going to connect to the network and publish a basic observation with these contents: “This is a sample observation”.
Sentilo configuration
You must have configured this information in the Sentilo catalog:
A provider (in our case, named samples-provider) and its token
A component (in our case, named sample-component)
A sensor (in our case, named sample-sensor-arduino-01 for the first example, and another one named sample-sensor-arduino-02 for the second one), with this minimum configuration settings:
sensor = sample-sensor-arduino-01
type = status
dataType = TEXT
component = sample-component
componentType = generic
Then, you must replace the client connection data code (next section) with yours settings:
- Change the value “YOUR_API_KEY” with the api key of your provider (variable apiKey)
- Change the value “YOUR_IP_ADDRESS” with the ip address of your Sentilo instance (variable ip)
- Change the value “YOUR_PORT” with the port of your Sentilo server instance port (variable port)
The code
You’ll should see this code in the editor:
#include <Ethernet.h>
#include <SPI.h>

#include "SentiloClient.h"

/*******************************************/
/***** SENTILO *****************************/
/*******************************************/
char* apiKey = "YOUR_API_KEY";
char* ip = "YOUR_IP_ADDRESS";
int port = YOUR_PORT;
char* componentId = "sample-component";
char* providerId = "samples-provider";
char* sensorId = "sample-sensor-arduino-01";

// The Sentilo Client object
SentiloClient sentiloClient = SentiloClient(ip, port);

/*******************************************/
/***** NETWORK *****************************/
/*******************************************/
const int networkConnectionTimeout = 30;

/*******************************************/
/***** GLOBAL VARS *************************/
/*******************************************/
const int generalCalibrationTimeout = 1000; // Wait after system setup is complete
String response = ""; // Rest call response (normally as JSON message)
int statusCode = -1; // Rest call return code (the HTTP code)

void setup() {
        // Begin serial for debug purposes
        Serial.begin(9600);

        // Setup the Sentilo Client and the network connection
        setupSentiloClient();

        // Wait time for a general calibration
        delay(generalCalibrationTimeout);
}

void loop() {
        // Create the Observation object
        SentiloClient::Observation observation;
        observation.value = "This is a sample observation";

        Serial.println("[loop] Publishing a sample observation...");

        // Publish the observation to Sentilo Platform
        statusCode = sentiloClient.publishObservation(providerId, sensorId, observation, apiKey, response);

        // Read response status and show an error if it is necessary
        if (statusCode !## 200) {
                Serial.print("[loop] [ERROR] Status code from server after publish the observations: ");
                Serial.println(statusCode);
                Serial.print("[loop] [ERROR] Response body from server after publish the observations: ");
                Serial.println(response);
        }

        Serial.println("[loop] Sample observation published!");
        Serial.println("[loop] Program ended");

        // The example has ended, so we are going to execute an infinite loop
        while (true) {}
}


/** Setup the Sentilo Client object, this process also configures the network connection **/
void setupSentiloClient() {
        Serial.print("[setup] Connecting to network via DHCP ");
        sentiloClient.dhcp();
        for (int i = 0; i < networkConnectionTimeout; i++) {
                Serial.print(".");
                delay(100);
        }
        Serial.println(" done!");
        Serial.println("[setup] Connection is now established!");
}
What can we see in this example?
- We are setting up the Serial channel for debug output
- Setup the SentiloClient object (sentiloClient), which configures the client and connects to the network
- Once we’re connected to the server, we publish a basic observation,
with these contents: “This is a sample observation”
- If the publish works properly, the system don’t return any special data
- Otherwise, it will show to you the system return code and message, if it is possible
- The test ends after publish only one observation
Second example: publishing sensors data as observations
In this case we’ll retrieve data from sensors (LDR and LM35), and then we’ll publish them as a observation, with a message in JSON format, like that:
{"ldr":"{ldrValue}","lm35":"{lm35Value}"}
Where the ldrValue contains the LDR photocell value, and the lm35Value contains the LM35 temperature value. Open the sample code in File > Examples > SentiloClient > SentiloClient-Example-02.
Connect the sensors and and other connections
Now, it is the time to connect the sensors and others elements.
See below:
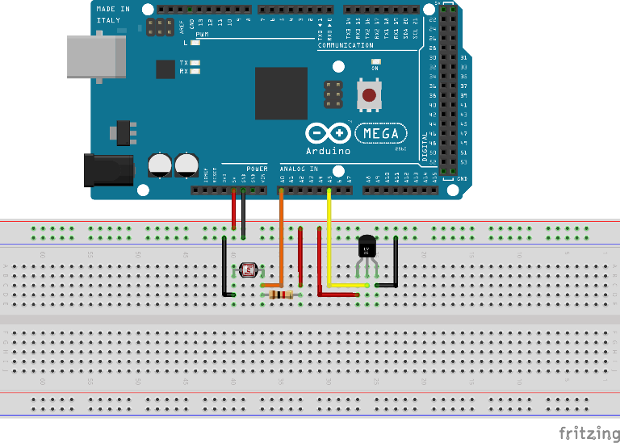
In the upper image, you can see how the components has been located:
- Connect the positive pin from Arduino (+5V) to the upper channel of the breadboard (red channel)
- Connect the negative pin from Arduino (GND) to the second channel of the breadboard (blue channel)
- LDR photocell sensor connection:
- Connect the LDR photocell between GND signal and A0 (Analog IO 0 from Arduino) with a dupont wire, in this case, the orange color wire
- Connect the LDR pin that holds the orange wire with a 1KOhm resistor, and the other resistor pin to Arduino +5V (red wire)
- LM35 temperature sensor:
- Connect the LM35 positive pin (left pin, front side) to Arduino +5V
- Connect the LM35 center pin (signal) to the A5 (Analog IO 5 from Arduino) with a dupont wire, in this case, the orange color wire
- Connect the LM35 negative pin (right pin, front side) to Arduino GND
The code
You should see this code in the editor:
#include <Ethernet.h>
#include <SPI.h>

#include "SentiloClient.h"

/*******************************************/
/***** SENSORS *****************************/
/*******************************************/
int LDR = 0; // LDR input is A0
int LM35 = 5; // LM35 input is A5
const int ldrSetupTimeout = 10; // Time that LDR needs to be configures (dummy time)
const int lm35SetupTimeout = 10; // Time that LM35 needs to be configures (dummy time)

/*******************************************/
/***** SENTILO *****************************/
/*******************************************/
char* apiKey = "YOUR_API_KEY";
char* ip = "YOUR_IP_ADDRESS";
int port = YOUR_PORT;
char* componentId = "sample-component";
char* providerId = "samples-provider";
char* sensorId = "sample-sensor-arduino-02";

// The Sentilo Client object
SentiloClient sentiloClient = SentiloClient(ip, port);

/*******************************************/
/***** NETWORK *****************************/
/*******************************************/
const int networkConnectionTimeout = 30;

/*******************************************/
/***** GLOBAL VARS *************************/
/*******************************************/
const int generalCalibrationTimeout = 1000; // Wait after system setup is complete
const int loopTimeout = 60000; // Loop timeout, time between observations (in ms)
String response = ""; // Rest call response (normally as JSON message)
int statusCode = -1; // Rest call return code (the HTTP code)

boolean existsSensor = false;

void setup() {
        // Begin serial for debug purposes
        Serial.begin(9600);

        // Setup the LDR sensor
        setupLDR();

        // Setup the LM35 sensor
        setupLM35();

        // Setup the Sentilo Client and network connection
        setupSentiloClient();

        // Wait time for a general calibration
        delay(generalCalibrationTimeout);
}

void loop() {
        // Get the LDR value
        int ldrValue = getLdrValue();

        // Get the LM35 value
        float lm35Value = getLM35Value();

        // Create the observation input message like this: {"ldr":"234","lm35":"24.5"}
        String obsInputMsg =
                "{\\\"ldr\\\":\\\"" + String(ldrValue) +
                "\\\",\\\"lm35\\\":\\\"" + String(lm35Value) +
                "\\\"}";
        int bufLength = obsInputMsg.length() + 1;
        char obsMsgBuffer[bufLength];
        obsInputMsg.toCharArray(obsMsgBuffer, bufLength);

        // Create the Observation object
        SentiloClient::Observation observation;
        observation.value = obsMsgBuffer;

        // Debug on Serial the observations value. Note that we must scape special characters
        Serial.print("[loop] Publishing actual sensors values as observations: ");
        Serial.println(obsMsgBuffer);

        // Publish the observation to Sentilo Platform
        statusCode = sentiloClient.publishObservation(providerId, sensorId, observation, apiKey, response);

        // Read response status and show an error if it is necessary
        if (statusCode !## 200) {
                Serial.print("[loop] [ERROR] Status code from server after publish the observations: ");
                Serial.println(statusCode);
                Serial.print("[loop] [ERROR] Response body from server after publish the observations: ");
                Serial.println(response);
        } else {
                Serial.println("[loop] Sensors observations published!");
        }

        delay(loopTimeout);
}

/** Emulate a possible LDR initialization process, if it is necessary **/
void setupLDR() {
        Serial.print("[setup] Setting up the LDR brightness sensor ");
        for (int i = 0; i < ldrSetupTimeout; i++) {
                Serial.print(".");
                delay(100);
        }
        Serial.println(" done!");
        delay(50);
}

/**  Get the brightness value from th LDR **/
int getLdrValue() {
        return analogRead(LDR);
}

/** Emulate a possible LM35 initialization process, if it is necessary **/
void setupLM35() {
        Serial.print("[setup] Setting up the LM35 temperature sensor ");
        for (int i = 0; i < lm35SetupTimeout; i++) {
                Serial.print(".");
                delay(100);
        }
        Serial.println(" done!");
        delay(50);
}

/** Get the LM 35 temperature value in Celsius degrees **/
float getLM35Value() {
        int val = analogRead(LM35);
        float mv = (val / 1024.0) * 5000;
        float cel = mv / 10;
        //float farh = (cel * 9) / 5 + 32;
        return cel;
}

/** Setup the Sentilo Client object. This process also configures the network connection **/
void setupSentiloClient() {
        // Connect via DHCP
        Serial.print("[setup] Connecting to network via DHCP ");
        sentiloClient.dhcp();
        for (int i = 0; i < networkConnectionTimeout; i++) {
                Serial.print(".");
                delay(100);
        }
        Serial.println(" done!");
        Serial.println("[setup] Connection is now established!");
}
What can we see in this example? There’re some additions compared with the first example.
- Setup Arduino and the SentiloClient is the same of the first sample
- We’re making a sensors setup, but in this case it isn’t necessary, so it only informs us in debug mode what is happening in every moment…
- Into the loop
- We’re retrieving the LDR and LM35 values, and putting them into variables
- Once we’ve retrieved the sensors data, we’re mounting the new
observation message, with value:
{"ldr":"{ldrValue}","lm35":"{lm35Value}"} - The SentiloClient library gets the value and transforms it on a complete observation message using the publishObservation method (see below)
- The sketch loops sleeps until loopTimeout millis has been reached, and then turns up and repeats the same process of data publication (in this example the sleep time is 60000ms, 1 minute per loop / publish)
This is the observation sent by to the Sentilo platform:
{"observations":[{
        "value":"{\"ldr\":\"{ldrValue}\",\"lm35\":\"{lm35Value}\"}"
   }]
}
If you want, you can include the timestamp variable in UTC format inside the observation object:
Observation observation;
observation.value = {"ldr":"382","lm35":"23.4"};
observation.timestamp = "05/05/2015T12:34:45";
And the message will be generated as:
{"observations": [{
        "value":"{\"ldr\":\"382\",\"lm35\":\"23.4\"}",
        "timestamp":"05/05/2015T12:34:45"
   }]
}
As you can see, the library object Observation (struct type) offers you an abstraction. In the next sample we will see them in working together with the Sensor object.
Third example: initialize sensor, create it in the catalog and publish observations continuously
In this third example we’ll see that how the SentiloClient library can create a sensor “on-the-fly” and publish observations continuously. Next, we’ll use the second example, plus a little bit of additional code that help us to check if the sensor exists in the catalog, and if not create it before publish observations. Open the sample code in File > Examples > SentiloClient > SentiloClient-Example-03.
The code
You should see this code in the editor:
#include <Ethernet.h>
#include <SPI.h>

#include "SentiloClient.h"

/*******************************************/
/***** SENSORS *****************************/
/*******************************************/
int LDR = 0; // LDR input is A0
int LM35 = 5; // LM35 input is A5
const int ldrSetupTimeout = 10; // Time that LDR needs to be configures (dummy time)
const int lm35SetupTimeout = 10; // Time that LM35 needs to be configures (dummy time)

/*******************************************/
/***** SENTILO *****************************/
/*******************************************/
char* apiKey = "YOUR_API_KEY";
char* ip = "YOUR_IP_ADDRESS";
int port = YOUR_PORT;
char* componentId = "sample-component";
char* providerId = "samples-provider";
char* sensorId = "sample-sensor-arduino-03";

// The Sentilo Client object
SentiloClient sentiloClient = SentiloClient(ip, port);

/*******************************************/
/***** NETWORK *****************************/
/*******************************************/
const int networkConnectionTimeout = 30;

/*******************************************/
/***** GLOBAL VARS *************************/
/*******************************************/
const int generalCalibrationTimeout = 1000; // Wait after system setup is complete
const int loopTimeout = 60000; // Loop timeout, time between observations publications (in ms)
String response = ""; // Rest call response (normally as JSON message)
int statusCode = -1; // Rest call return code (the HTTP code)

boolean existsSensor = false;

void setup() {
        // Begin serial for debug purposes
        Serial.begin(9600);

        // Setup the LDR sensor
        setupLDR();

        // Setup the LM35 sensor
        setupLM35();

        // Setup the Sentilo Client
        // and network connection
        setupSentiloClient();

        // Setup the Sentilo sensor
        // and create it if doesn't exists
        setupSentiloSensor();

        // Waiting for the next release of the observation
        delay(generalCalibrationTimeout);
}

void loop() {
        if (existsSensor) {
                // If the sensor exists,
                // we can start publishing observations

                // Get the LDR value
                int ldrValue = getLdrValue();

                // Get the LM35 value
                float lm35Value = getLM35Value();

                // Create the observation input message
                // like this: {"ldr":"234","lm35":"24.5"}
                String obsInputMsg =
                        "{\\\"ldr\\\":\\\"" + String(ldrValue) +
                        "\\\",\\\"lm35\\\":\\\"" + String(lm35Value) +
                        "\\\"}";
                int bufLength = obsInputMsg.length() + 1;
                char obsMsgBuffer[bufLength];
                obsInputMsg.toCharArray(obsMsgBuffer, bufLength);

                // Create the Observation object
                SentiloClient::Observation observation;
                observation.value = obsMsgBuffer;

                // Debug on Serial the observations value
                // Note that the message includes slashes (\) because we must scape special characters as "
                Serial.print("[loop] Publishing actual sensors values as observations: ");
                Serial.println(obsMsgBuffer);

                // Publish the observation to Sentilo Platform
                statusCode = sentiloClient.publishObservation(providerId, sensorId, observation, apiKey, response);

                // Read response status and show an error if it is necessary
                if (statusCode !## 200) {
                        Serial.print("[loop] [ERROR] Status code from server after publish the observations: ");
                        Serial.println(statusCode);
                        Serial.print("[loop] [ERROR] Response body from server after publish the observations: ");
                        Serial.println(response);
                } else {
                        Serial.println("[loop] Sensors observations published!");
         }

        // Waiting for the next loop
        delay(loopTimeout);
        } else {
                // If the sensor does not exist and it could
                // not be created in the catalog, we must stop running
                Serial.println("[loop] [ERROR] Oops! The sensor doesn't exists, so I can't publish data to it...");
                Serial.println("[loop] [ERROR] I'm sorry with you, but now I'm going to halt...");
                Serial.println("[loop] [ERROR] Bye!");
                while (true) { }
        }
}

// Emulate a possible LDR initialization process, if it is necessary
void setupLDR() {
        Serial.print("[setup] Setting up the LDR brightness sensor ");
        for (int i = 0; i < ldrSetupTimeout; i++) {
                Serial.print(".");
                delay(100);
        }
        Serial.println(" done!");
        delay(50);
}

// Get the brightness value from th LDR
int getLdrValue() {
        return analogRead(LDR);
}

// Emulate a possible LM35 initialization process, if it is necessary
void setupLM35() {
        Serial.print("[setup] Setting up the LM35 temperature sensor ");
        for (int i = 0; i < lm35SetupTimeout; i++) {
                Serial.print(".");
                delay(100);
        }
 Serial.println(" done!");
        delay(50);
}

// Get the LM 35 temperature value in Celsius degrees
float getLM35Value() {
        int val = analogRead(LM35);
        float mv = (val / 1024.0) * 5000;
        float cel = mv / 10;
        //float farh = (cel * 9) / 5 + 32;
        return cel;
}

// Setup the Sentilo Client object
// This process also configures the network connection
void setupSentiloClient() {
        // Connect via DHCP
        Serial.print("[setup] Connecting to network via DHCP ");
        sentiloClient.dhcp();
        for (int i = 0; i < networkConnectionTimeout; i++) {
                Serial.print(".");
                delay(100);
        }
        Serial.println(" done!");
        Serial.println("[setup] Connection is now established!");
}

// Setup the Sentilo Sensor (this Arduino)
// If the sensor doesn't exists in the catalog, create it
void setupSentiloSensor() {
        Serial.println("[setup] Retrieving catalog info from Sentilo and search for the sensor...");

        // Get catalog data for the provider with the supplied api key
        statusCode = sentiloClient.getCatalog(apiKey, response);

        // If the server status response is not ok, show the error
        if (statusCode !## 200) {
                Serial.print("[setup] [ERROR] Status code from server getting catalog: ");
                Serial.println(statusCode);
                Serial.print("[setup] [ERROR] Response body from server getting catalog: ");
                Serial.println(response);
        } else {
                // If we get a correct response, we must search the sensor
                if (find_text(sensorId, response) >## 0) {
                        // The sensor is in the catalog
                        Serial.println("[setup] The sensor is in the catalog");
                        existsSensor = true;
                } else {
                        // The sensor isn't in the catalog, so we must create it
                        Serial.println("[setup] The sensor isn't in the catalog, so let register it now...");

                        // Create the basic Sentilo Sensor Object
                        SentiloClient::Sensor sensor;
                        sensor.sensor = sensorId;
                        sensor.type = "status";
                        sensor.dataType = "TEXT";
                        sensor.component = componentId;
                        sensor.componentType = "generic";
                        sensor.location = "sensorLat sensorLng";

                        // Call the SentiloClient Register Sensor function
                        statusCode = sentiloClient.registerSensor(sensor, providerId, apiKey, response);

                        // Read the server status response
                        if (statusCode 200) {
                                // If ok, the sensor has been yet created
                                existsSensor = true;
                        } else {
                                // If nok, then we can't continue with the program
                                existsSensor = false;
                                Serial.print("[setup] [ERROR] Status code from server getting catalog: ");
                                Serial.println(statusCode);
                                Serial.print("[setup] [ERROR] Response body from server getting catalog: ");
                                Serial.println(response);
                        }
                }
        }
}

// Auxiliary function for search text in a String
int find_text(String needle, String haystack) {
        int foundpos = -1;
        for (int i = 0; (i < haystack.length() - needle.length()); i++) {
                if (haystack.substring(i, needle.length() + i) needle) {
                        foundpos = i;
                }
        }
        return foundpos;
}
And finally, in the last example, we can see:
- Initialization is the same that in the other examples
- Before ending the initialization process, we search for the sensor in
the catalog:
- Into the setupSentiloSensor() method, the sentiloClient.getCatalog retrieves all the catalog data related to the provider, so we can now search for the value of our sensor, in this case, sample-sensor-arduino-03, and we see that it doesn’t exists in the catalog (you must not create it manually!)
- Then, create it with sentiloClient.registerSensor, including a Sensor object (see values below), if you want to publish its location don’t forget to initialize the sensorLat and sensorLng values!
- Once the sensor is created, we end the setup process and starts the loop
- If there is any error registering the sensor, the serial prints the error message and the server status code in the console
- In the loop, like in Example 2, retrieve sensors data (LDR and LM35), and publish them as new sensor observation
Next, there is an example of Sensor object message with the example values:
SentiloClient::Sensor sensor;
sensor.sensor = "sample-sensor-arduino-03";
sensor.type = "status";
sensor.dataType = "TEXT";
sensor.component = "sample-component";
sensor.componentType = "generic";
sensor.location = "41,385063 2,1734034";
And before invoking the Sentilo API Rest platform, the SentiloClient library transforms this object in a JSON message like this:
{"sensors":[{
        "sensor":"sample-sensor-arduino-03",
        "description":"",
        "type":"status",
        "dataType":"TEXT",
        "unit":"",
        "component":"sample-component",
        "componentType":"generic",
        "componentDesc":"",
        "location":"41,385063 2,1734034",
        "timeZone":"CET"
   }]
}
As you can see, the type is generic and the data type is text, because this is the best way to publish any data without any format problem.