Setup
This guide describes how to: download, configure, compile and install the last version of Sentilo in your own runtime environment. Moreover, it details which are the infrastructure elements necessary for running Sentilo and how should be their default configuration settings. It’s assumed you have the skills to configure and install the necessary software base(Operating System, Maven,JDK, Mongo DB, Redis, etc).
The main topics are:
- Prerequisites: describes the software elements that have to be installed before download the code.
- Download and build: explains the steps to obtain the Sentilo code, to adapt it and how to build the platform artifacts.
- Platform infrastructure: describes the mandatory infrastructure components for running Sentilo and its default configuration settings.
- Deploy the artifacts: describes the necessary steps to deploy all the Sentilo modules
Prerequisites
Sentilo uses Maven as a mechanism for building and managing the dependencies of the platform. In order to build Sentilo, it is necessary to ensure the next set of prerequisites:
- JDK 1.8.x +
- Git (optional)
- Maven 3 +
- Ensure that the the Java SDK and Maven executables are accessible using your PATH environment variable.
Download and build code
The Sentilo code must be downloaded from Github. Once downloaded, you can build it using a script named buildSentilo.sh which constructs the Sentilo artifacts “out-of-the-box”.
Download the source code from Github
The source code of the project can be obtained from git, cloning the remote project in a local directory named sentilo:
git clone https://github.com/sentilo/sentilo.git sentilo
An alternative method is to download a ZIP file from github repository and decompress it in a folder named sentilo:
https://github.com/sentilo/sentilo/archive/master.zip
In both cases, we will finally have a new directory named sentilo with the source code.
Compiling and build artifacts
Without changing the default configuration
If you want to build Sentilo out-of-the-box (i.e. build all artifacts that define the Sentilo platform without changing any of the default settings that are defined), we distribute a script named ./scripts/buildSentilo.sh which can be used to build Sentilo from the command line.
This script compiles the code and build the artifacts from scratch, but it doesn’t deploy them in the execution environments. This process must be done manually by different reasons, for example:
- The deployment environment could be distributed in different servers. In example, Tomcat server and Pub/Subscribe server.
- it’s not required to install all the components, like the relational database agent.
Once this script is executed, the result of the construction of the artifacts will be located, by default, in the directory ../sentilo-deploy-artifacts (local from current directory).
The content of the sentilo-deploy-artifacts directory will be:
- conf: contains all the Sentilo configuration files, both for the service, the catalog application and for all the agents
- sentilo-agent-activity-monitor: contains the directory structure resulting from running
mvn appassembler:assembleon the sentilo-agent-activity-monitor module - sentilo-agent-alert: contains the directory structure resulting from running
mvn appassembler:assembleon the sentilo-agent-alert module - sentilo-agent-federation: contains the directory structure resulting from running
mvn appassembler:assembleon the sentilo-agent-federation module - sentilo-agent-historian: contains the directory structure resulting from running
mvn appassembler:assembleon the sentilo-agent-historian module - sentilo-agent-kafka: contains the directory structure resulting from running
mvn appassembler:assembleon the sentilo-agent-kafka module - sentilo-agent-location-updater: contains the directory structure resulting from running
mvn appassembler:assembleon the sentilo-agent-location-updater module - sentilo-agent-metrics-monitor: contains the directory structure resulting from running
mvn appassembler:assembleon the sentilo-agent-metrics-monitor module - sentilo-agent-relational: contains the directory structure resulting from running
mvn appassembler:assembleon the sentilo-agent-relational module - sentilo-catalog-web: contains the war of the web application once packaged
- sentilo-platform-server: contains the directory structure resulting from running
mvn appassembler:assembleon the sentilo-platform-server module
Changing default settings
If you want modify the code before to build it, you should import it into an Eclipse workspace with maven plug-in installed. Below we explain how to do it by using the M2E plugin.
- Open the Eclipse workspace to import the code:
- Go to File> Import> Existing Maven Projects
- Select ./sentilo as the root directory
- Select all projects and import
Warning: be sure that JDK 1.8, or later, is correctly configured in your Eclipse environment.
After modifying the code, to compile and build the artifacts, our recommendation is to use the above mentioned buildSentilo.sh script.
Platform infrastructure
Before describing how to install all the Sentilo components, we’re going to explain how to configure each element of the infrastructure.
Sentilo uses the following infrastructure elements (they are grouped into two categories):
- Mandatory
- Redis 6.2.2
- MongoDB 4.4.2
- Tomcat 8.5.32 +
- Optional
- MySQL 5.5.x (Sentilo has been tested on MySQL 5.5.34 but you could use your favourite RDBMS) It is only necessary if you want to install the relational agent
- Elasticsearch 6+ It is only necessary if you want to install the activity-monitor agent.
- openTSDB 2.2.0 + It is only necessary if you want to install the historian agent
You must ensure that you have all these elements installed properly (you can find information on how to install them in each provider site).
Below we explain the default settings for each Sentilo module.
Default settings
Sentilo configuration uses the Spring and Maven profiles to allow its customization depending on the runtime environment. By default, the platform comes with a predefined profile named dev, which considers that each of these infrastructure elements are installed on the same machine and listening in the following ports:
- Redis: 6379
- MongoDB: 27017
- Tomcat: 8080
- MySQL: 3306
- Elasticsearch: 9200
- openTSDB: 4242
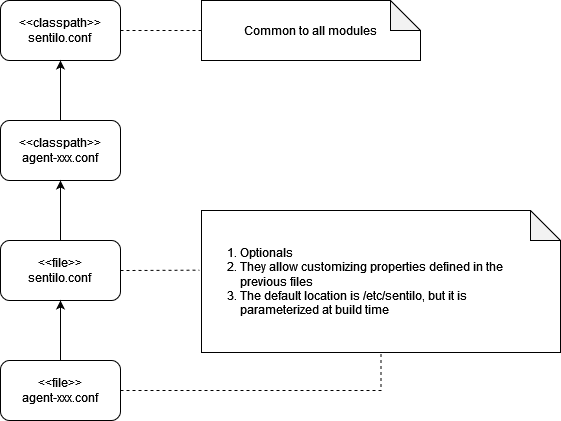
The default configuration for the entire platform is located in the file:
/sentilo-common/src/main/resources/properties/sentilo.conf.
All other specific settings can be found in the subdirectory
/src/main/resources/properties of each platform’s module.
In general, Sentilo’s configuration is described in the sentilo.conf
file, while the rest of the components are described in their own .conf file.
The sentilo.conf file must be deployed in the default directory
/etc/sentilo, in which the necessary parameters according to our
installation must be overwritten later.
The other configuration files for agents, for example, can be overwritten in the same way, deploying them in the same directory specified above, and with the specific name set by each of the agents.
Therefore, we will have the files with the base configuration inside the package of each one of the modules (classpath) and the configuration files with the specific values displayed in the /etc/sentilo directory, which will overwrite the original ones. In this way, we can change any Sentilo parameterization just by modifying the deployed file and restarting the instance:
For example, here we can see a default configuration (first lines) and the overridden values for different execution environments for Redis host:
--  classpath:sentilo.conf
sentilo.version=2.1.0
sentilo.redis.host=127.0.0.1

-- /etc/sentilo/sentilo.conf for DSV environment
sentilo.redis.host=192.168.2.106

-- /etc/sentilo/sentilo.conf for PRE environment
sentilo.redis.host=10.65.124.22
Each module will define the location of its configuration file within the
xxx-properties-context.xml file.
For example, this is the case of the relational agent:
<context:property-placeholder ignore-unresolvable="true" properties-ref="sentiloConfigProperties"/>

<util:properties id="sentiloConfigProperties"  location="classpath*:properties/sentilo.conf,
    classpath*:properties/sentilo-agent-relational.conf, file:${sentilo.conf.dir}/sentilo.conf,
    file:${sentilo.conf.dir}/sentilo-agent-relational.conf" ignore-resource-not-found="true"/>
Note: The variable ${sentilo.conf.dir} is resolved in compilation time
and its default value is /etc/sentilo
These are the default params for the sentilo.conf file:
| Param | Default value | Description |
|---|---|---|
| sentilo.master.application.id | sentilo-catalog | Identification of the master application of the catalog, application that has administrative rights over all the rest |
| sentilo.version | 2.0.0-HA | Indicates the deployed version of Sentilo, and can be found both in the source code of a catalog page and in the response headers to an API call |
| sentilo.redis.password | sentilo | Redis access password (same value as the requirepass parameter in the Redis configuration) |
| sentilo.redis.expire.key.seconds | 0 | Lifetime of data in Redis: after this time the data expires and can no longer be retrieved via the API. A value of 0 indicates that they do not expire |
| sentilo.redis.connTimeout | 5000(ms) | Timeout waiting in the execution of any request to Redis |
| sentilo.redis.client.maxTotal | 10 | Maximum number of connections in the pool |
| sentilo.redis.client.maxIdle | 10 | Maximum number of idle connections in the pool |
| sentilo.redis.client.maxWaitMillis | -1 | Maximum timeout (ms) for a new connection. -1 indicates no maximum |
| sentilo.redis.client.testOnBorrow | true | Indicates whether to validate a connection from the pool before reusing it |
| sentilo.redis.client.testOnCreate | true | Same as the previous one, but at the time of creation |
| sentilo.redis.client.testOnReturn | false | Same as the previous one but when returning the connection to the pool |
| sentilo.redis.client.testWhileIdle | true | Same as above but the validation is performed while the connection remains unused in the pool (internally the validation is executed every 30s, not configurable) |
| sentilo.redis.host | 127.0.0.1 | IP of the machine where the Redis server is (in standalone mode) |
| sentilo.redis.port | 6379 | Port on which the Redis server is listening for requests (in standalone mode) |
| sentilo.redis.cluster.nodes | 127.0.0.1:6379 | List with the addresses (ip:port) of the different nodes of the Redis cluster |
| sentilo.redis.cluster.maxRedirects | 3 | Maximum number of redirects to follow between nodes in a request to the cluster |
| sentilo.mongodb.host | 127.0.0.1 | IP of the machine on which the node with PRIMARY role is installed, in the case of a cluster, or simply the server |
| sentilo.mongodb.port | 27017 | Port on which the MongoDB server is listening for requests |
| sentilo.mongodb.database | sentilo | Name of the db to connect to |
| sentilo.mongodb.user | sentilo | User to use when authenticating to the MongoDB server |
| sentilo.mongodb.password | sentilo | Password to use when authenticating to the MongoDB server |
| sentilo.mongodb.cluster-type | STANDALONE | Instance mode. Switch to REPLICA_SET in case of cluster |
| sentilo.mongodb.rs | rs_sentilo | Name of replica set in case of cluster |
| sentilo.mongodb.pool.max-connections | 100 | Maximum number of connections that can be established to MongoDB from a module |
| sentilo.mongodb.application-name | sentilo | Name of the module that establishes the connection to MongoDB (for auditing purposes. Viewed in the MongoDB log) |
| sentilo.catalog.rest.endpoint | http://127.0.0.1:8080/sentilo-catalog-web/ | API URL Rest of the catalog (used internally by the rest of the modules) |
| sentilo.catalog.rest.credentials | platform_user:sentilo | Credentials (user:password) to use in the authentication of the rest of the catalog API (must be the credentials of a catalog user with the PLATFORM_USER role) |
| sentilo.api.rest.endpoint | 127.0.0.1:8081 | Sentilo Rest API URL (used internally by the rest of the modules) |
| sentilo.api.rest.identity.key | Token to be used internally in calls to Sentilo’s Rest API. Must match the entity token given in the sentilo.api.rest.identity.key parameter | |
| sentilo.agent.pending_events_job.batch | 50 | Maximum size (N) of the batch of pending messages to be retrieved and processed from the PEL (pending event list) of each agent in each call. The process runs iteratively in batches of size N until the list is empty |
| sentilo.agent.pending_events_job.delay | 30000 (ms) | Waiting time between executions of the job that is responsible for processing pending messages in the PEL of an agent |
| sentilo.agent.batch.size | 10 | Batch size in which an agent processes incoming messages and keeps them in memory |
| sentilo.agent.batch.workers.size.min | 0 | Minimum number of workers to be used by an agent to process incoming messages queued in memory |
| sentilo.agent.batch.workers.size.max | 3 | Maximum number of workers to be used by an agent to process incoming messages queued in memory |
| sentilo.agent.batch.max.retries | 1 | Number of retries an agent performs before rejecting a batch of messages and saving them to the Redis PEL for further processing |
Redis settings
Sentilo default settings consider Redis will be listening on port 6379, host 127.0.0.1, and with the parameter requirepass enabled and with value sentilo.
If you change this behaviour, you need to modify the sentilo.conf file, by editing following properties:
sentilo.redis.host=127.0.0.1
sentilo.redis.port=6379
sentilo.redis.password=sentilo
See other available Redis settings in above table, under sentilo.redis.* base path.
MongoDB settings
Sentilo default settings consider MongoDB will be listening on 127.0.0.1:27017, and requires an existing database named sentilo, created before starting the platform, with authentication enabled and with login credentials preconfigured as sentilo/sentilo (username~:sentilo, password~:sentilo).
If you change this behaviour, you need to modify the sentilo.conf file, by editing following properties:
sentilo.mongodb.host=127.0.0.1
sentilo.mongodb.port=27017
sentilo.mongodb.user=sentilo
sentilo.mongodb.password=sentilo
See other available MongoDB settings in above table, under sentilo.mongodb.* base path.
Data load
Moreover, you need to load on sentilo database the basic set of data needed to run the platform. The data include, among other things:
- An user admin: user for log in into the catalog webapp as administrator.
- An user sadmin: user for log in into the catalog webapp with role super-admin.
- An user platform_user: internal user used by the platform to synchronize information between its components.
To do this, you must load the data defined in the file:
./scripts/mongodb/init_data.js
For example, in your MongoDB machine, you should execute the following command from the directory where the file is located:
mongo -u sentilo -p sentilo sentilo init_data.js
Note
The file init_data.js contains default passwords and tokens (which are ok for run Sentilo in a test environment). In order to avoid compromising your platform, we recommend to change them before installing Sentilo in a production environment.
If you change default values in the /sentilo/scripts/mongodb/init_data.js file and load them to
MongoDB, you will have to modify the following properties, located in sentilo.conf file, and restart Sentilo. So, following
JS code from init_data.js :
Corresponds with:
sentilo.api.rest.identity.key=c956c302086a042dd0426b4e62652273e05a6ce74d0b77f8b5602e0811025066
sentilo.catalog.rest.credentials=platform_user:sentilo
, being sentilo.api.rest.identity.key the token of a sentilo-catalog application, and sentilo.catalog.rest.credentials value is a combination of user platform_user and it’s password.
Test data load
In order to validate the correct installation of the platform, we could load a set of test data. These data includes, among other things: sensor types, component types, apps and providers.
These data is defined in the file:
./scripts/mongodb/init_test_data.js
and, as pointed above, you should run the following command to load it:
mongo -u sentilo -p sentilo sentilo init_test_data.js
MySQL settings
Note
This software is mandatory only if you want to export the published events to a relational database using the Relational Database Agent. Otherwise, you can skip this step. Please, check this out for more info.
Sentilo default settings consider MySQL server will be listening on 127.0.0.1:3306, and requires an existing database named sentilo, created before starting the platform, with authentication enabled and accessible using credentials sentilo_user/sentilo_pwd (username~:sentilo_user, password~:sentilo_pwd).
If you change this behaviour, you need to modify the following properties:
sentilo.agent.relational.ds.jdbc.driverClassName=com.mysql.jdbc.Driver
sentilo.agent.relational.ds.url=jdbc:mysql://127.0.0.1:3306/sentilo
sentilo.agent.relational.ds.username=sentilo_user
sentilo.agent.relational.ds.password=sentilo_pwd
configured in the file:
sentilo-agent-relational/src/main/resources/properties/sentilo-agent-relational.conf
Creating the tables
Once we have MySQL configured, and the database sentilo created, the next step is to create the database tables required to persist historical platform data.
At the following directory of your Sentilo installation:
sentilo-agent-relational/src/main/resources/bd
you’ll find the script to create these tables.
Tomcat settings
Sentilo default settings consider Tomcat will be listening on 127.0.0.1:8080.
If you change this behaviour, you need to modify the following property:
sentilo.catalog.rest.endpoint=http://127.0.0.1:8080/sentilo-catalog-web/
configured in the sentilo.conf file.
Your Tomcat should also be started with the user timezone environment variable set as UTC. To set Timezone in Tomcat, the startup script (e.g. catalina.sh or setup.sh) must be modified to include the following code:
-Duser.timezone=UTC
API server (Subscription/publication) settings
Sentilo default settings consider subscription/publication server (a.k.a. PubSub server) will be listening on 127.0.0.1:8081
If you change this behaviour, you need to modify the following properties:
sentilo.api.rest.endpoint=127.0.0.1:8081
configured in the sentilo.conf file.
Configuring logs
Sentilo uses slf4j and logback as trace frameworks. The configuration can be found in logback.xml file, located in the subdirectory src/main/resources of sentilo-common module of the platform.
By default, all platform logs are stored in the directory /var/log/sentilo
Platform installation
Once you have downloaded the code and you have modify, compile and built it, the next step is to deploy Sentilo artifacts. The platform has five artifacts:
- Web Application Catalog (is mandatory)
- Server publication and subscription (is mandatory)
- Alarms agent is not strictly mandatory, however you’ll need it if you want to provide alerts.
- Location updater agent is not strictly mandatory, however you’ll need it if you want to update locations in case you have mobile components.
- All other agents (are optional):
Installing the Web App Catalog
After build Sentilo, to install the Web App, you just need to deploy the WAR artifact in your Tomcat server, i.e., copy the WAR artifact into the webapps subdirectory of your Tomcat server.
You will find the WAR artifact at the following subdirectory:
./sentilo-catalog-web/target/sentilo-catalog-web.war
Installing API server (subscription/publication)
After build Sentilo (see Compiling and build artifacts), to install the API (pub/sub) server, you need to follow the following steps:
- Into the directory ../sentilo-deploy-artifacts/sentilo-platform-server/ you’ll find two subdirectories named repo and bin:
- repo directory contains all libraries needed to run the process
- bin directory contains the script (sentilo-server) needed to initialize the process (there are two scripts, one for Linux systems and one for Windows)
- Copy these two directories in the root directory where you want to install this component (for example: /opt/sentilo-server).
- Once copied, for starting the process you just need to run the script:
$ <path_to_sentilo-server>/bin/sentilo-server
Installing agents
As have been mentioned previously, all agents are optional and you are free to choose which of them will be deployed, depending on your specific needs. Agents are internal modules oriented to expand the platform functionality without having to alter its core. You will find more information about them in the Integrations section of our documentation.
The buildSentilo.sh script builds also all agents. If you decide to install some of them, you just have to copy the contents of the sentilo-deploy-artifactts agent’s directory to the path you want the agent to be installed (see Compiling and build artifacts).
For example, Alert agent would be installed like this:
- In the directory ../sentilo-deploy-artifacts/sentilo-agent-alert/ you’ll find two subdirectories named repo and bin:
- repo directory contains all libraries needed to run the process
- bin directory contains the script (sentilo-agent-alert-server) needed to initialize the process (there are two scripts, one for Linux systems and one for Windows)
- Copy these two directories in the root directory where you want to install this component (for example: /opt/sentilo-agent-alert).
- Once copied, for starting the process you just need to run the following script:
$ <path-to-agent-alert>/bin/sentilo-agent-alert-server
All other agents follow the exact same directory structure.
Note
Agent configuration can be done at any time by modifying it own agent-xxx.conf file and restarting it. It is documented in their respective page
Enable multi-tenant instance
In order to enable multi-tenant feature you need to ensure that your Sentilo version is at least 1.5.0. Otherwise you will have to upgrade your Sentilo instance.
Once the above requirement is fulfilled, you only need to do the following steps:
Modify your Tomcat startup script
You should modify your Tomcat startup script (e.g %TOMCAT_HOME%/bin/catalina.sh or %TOMCAT_HOME%/bin/setenv.sh) to add a new JVM property:
-Dsentilo.multitenant=true
Once you have added the JVM property, you must restart your Tomcat server.
Edit the Catalog web.xml file
The next step is to edit the Catalog file web.xml located at:
sentilo-catalog-web/src/main/webapp/WEB-INF/web.xml
You will find some lines that are commented into this file which are needed to enable the multi-tenant feature. Therefore you should uncomment them:
<!--
    <filter>
        <filter-name>UrlRewriteFilter</filter-name>
        <filter-class>org.tuckey.web.filters.urlrewrite.UrlRewriteFilter</filter-class>
        <init-param>
            <param-name>logLevel</param-name>
            <param-value>slf4j</param-value>
        </init-param>
    </filter>


    <filter>
        <filter-name>tenantInterceptorFilter</filter-name>
        <filter-class>org.sentilo.web.catalog.web.TenantInterceptorFilter</filter-class>
    </filter>
-->

<!--
    <filter-mapping>
        <filter-name>tenantInterceptorFilter</filter-name>
        <url-pattern>/*</url-pattern>
        <dispatcher>REQUEST</dispatcher>
    </filter-mapping>
    <filter-mapping>
        <filter-name>UrlRewriteFilter</filter-name>
        <url-pattern>/*</url-pattern>
        <dispatcher>REQUEST</dispatcher>
        <dispatcher>FORWARD</dispatcher>
    </filter-mapping>
-->
Once you have uncomment the above lines, you should recompile the Catalog webapp module and redeploy it into your Tomcat server.
You will find more information about this feature in the Multi-Tenant section of our documentation.
Enable anonymous access to REST API
By default, anonymous access to REST API is disabled, e.g. all requests to REST API must be identified with the identity_key header.
Enabling anonymous access to the REST API means that only authorized data of your Sentilo instance can be accessed. Access to authorized data is described below.
In order to enable anonymous access you should modify the file sentilo-platform/sentilo-platform-service/src/main/resources/properties/sentilo-platform.conf:
# Properties to configure the anonymous access to Sentilo
sentilo.server.api.anonymous.enable=false
sentilo.server.api.anonymous.entity-id=
If anonymous access is enabled (sentilo.server.api.anonymous.enable=true), then all anonymous requests to REST API are internally considered as is they have been performed by the application client identified by the sentilo.server.api.anonymous.entity-id property value (this application client should exist into your Sentilo Catalog), and therefore these requests will have the same data restrictions as the requests performed by this client application.
Enable Cluster Mode
Since version 2.0, Sentilo offers the possibility of configuring the instance to work in cluster mode, thus favoring high availability (HA).
Since this mode substantially improves response times and overall performance of all platform components, it is highly recommended to configure production environments using this method.
Sentilo will improve its performance thanks to the particularity of the Redis Cluster mode, which improves the response times of the stored data, as well as a great improvement in its transmission, partly thanks to the use of Redis streams, also introduced in the version 2.0.
Requirements
To activate the cluster mode or high availability of Sentilo it is necessary to modify a specific parameterization that we will discuss below.
In addition, the use of the Redis cluster mode is mandatory.
If you want to have several instances of the API Server and/or the Catalog, you must have a web balancer, such as NGINX, to be able to balance the load of the servers
Configuration
Once we have all the requirements ready (especially the Redis Cluster mode), we must make the following modifications in the Sentilo configuration:
- File sentilo.conf: configure the parameters associated with the Redis cluster
(
sentilo.redis.cluster.nodes, see it at Default settings) - For every Sentilo artifact startup scripts: add the JVM param
-Dspring.profiles.active=cluster.
Once this is done, we can start our instance in high availability cluster mode normally.
What next?
Check the Quick Start Page or Platform Testing page.